
-
YumaPOS
-
- The YumaPOS Ecosystem
- Plan Where You Want to be in 6 and 12 Months from Now
- Create Your YumaPOS TENANT
- Create STORES in your YumaPOS TENANT
- Make Life Easy : Preset Some Basic Settings
- Which is best for You? Manual Entry or Data Import?
- Great Structure Makes Selling Easier
- Positive Planning Prevents Poor Performance
- POS and ORDER Fundamentals
- Getting to Know Your New BOM
- Cheap Internet Can Cost Businesses Time, Money and Productivity
- Security : Do you Really Want Your Staff Doing That?
- Stock Control: What It Is and How to Know If It’s Right for Your Business
- Scale Your Business : YumaPOS for Single to Franchise Growth
- A Quick Guide to Where ITEM Cost Comes From
- Know Your Customers, Earn Their Loyalty, Grow Your Sales
- Yumapos Price Lists, Holiday Promotions & Surcharging - Made Easy
- Glossary of Terms
- Show Remaining Articles (3) Collapse Articles
-
-
- Quickly List Transactions Created by Your STORES and APPs
- Easily See Transactions by Staff Member
- It is Simple to Track Sales by Terminal
- Processing Order Tracking: How to Minimise Operational Loss
- Voided Orders Explained: Why You Need to Catch Them
- Action Logs: Why they are Important to Your Business
-
-
- Articles coming soon
-
- Articles coming soon
-
- Articles coming soon
-
- Articles coming soon
-
- Articles coming soon
-
- Articles coming soon
-
- Articles coming soon
-
- Articles coming soon
-
- Articles coming soon
-
- Articles coming soon
-
- Articles coming soon
-
- Articles coming soon
-
- Articles coming soon
-
-
- Inventory Items & Menu Items: Can You Tell the Difference ?
- Your Easy Guide to Menu Item Basics
- How to View and Manage the Menu Items List
- Create and Manage Menu Categories Easily
- Understanding Item Modifiers for Accurate Production and Lower Costs
- Complete Guide to Managing Item Modifiers in Your Business
- Point of Sale Price Lists Made Easy : A Complete Guide
- Daily Menu Configuration and How to Use Them
- How to Use Stop Lists to Prevent Overselling
- Changing Default Language for Production
-
-
- Articles coming soon
-
- Articles coming soon
-
- Articles coming soon
-
- Articles coming soon
-
- Articles coming soon
-
- Articles coming soon
-
-
-
- Articles coming soon
-
- Articles coming soon
-
- Articles coming soon
-
-
-
- Articles coming soon
-
- Articles coming soon
-
- Articles coming soon
-
- Articles coming soon
-
- Articles coming soon
-
-
-
- Articles coming soon
-
- Articles coming soon
-
- Articles coming soon
-
- Articles coming soon
-
-
-
- Articles coming soon
-
- Articles coming soon
-
- Articles coming soon
-
- Articles coming soon
-
-
-
- Articles coming soon
-
- Articles coming soon
-
- Articles coming soon
-
- Articles coming soon
-
- Articles coming soon
-
- Articles coming soon
-
- Articles coming soon
-
- Articles coming soon
-
- Articles coming soon
-
- Articles coming soon
-
- Articles coming soon
-
-
-
- Articles coming soon
-
- Articles coming soon
-
- Articles coming soon
-
- Articles coming soon
-
- Articles coming soon
-
- Articles coming soon
-
- Articles coming soon
-
- Articles coming soon
-
- Articles coming soon
-
- Articles coming soon
-
- Articles coming soon
-
-
-
- Articles coming soon
-
- Articles coming soon
-
- Articles coming soon
-
- Articles coming soon
-
- Articles coming soon
-
- Articles coming soon
-
-
- Articles coming soon
-
- Articles coming soon
-
- Articles coming soon
-
- Articles coming soon
-
- Articles coming soon
-
- Articles coming soon
-
- Articles coming soon
-
-
- Articles coming soon
-
- Articles coming soon
-
- Articles coming soon
-
- Articles coming soon
-
- Articles coming soon
-
- Articles coming soon
-
- Articles coming soon
-
-
- Articles coming soon
-
-
-
YumaPAY
Define Menu Category
In YumPOS, the term MENU CATEGORY refers to a group of MENU ITEMS that will “usually” have similar properties, that are grouped together to make selling them easier.
This article helps you use and manage MENU CATEGORIES.
View the Categories List
Sign into your BOM, expand the <Items List> node and select <Categories List>.
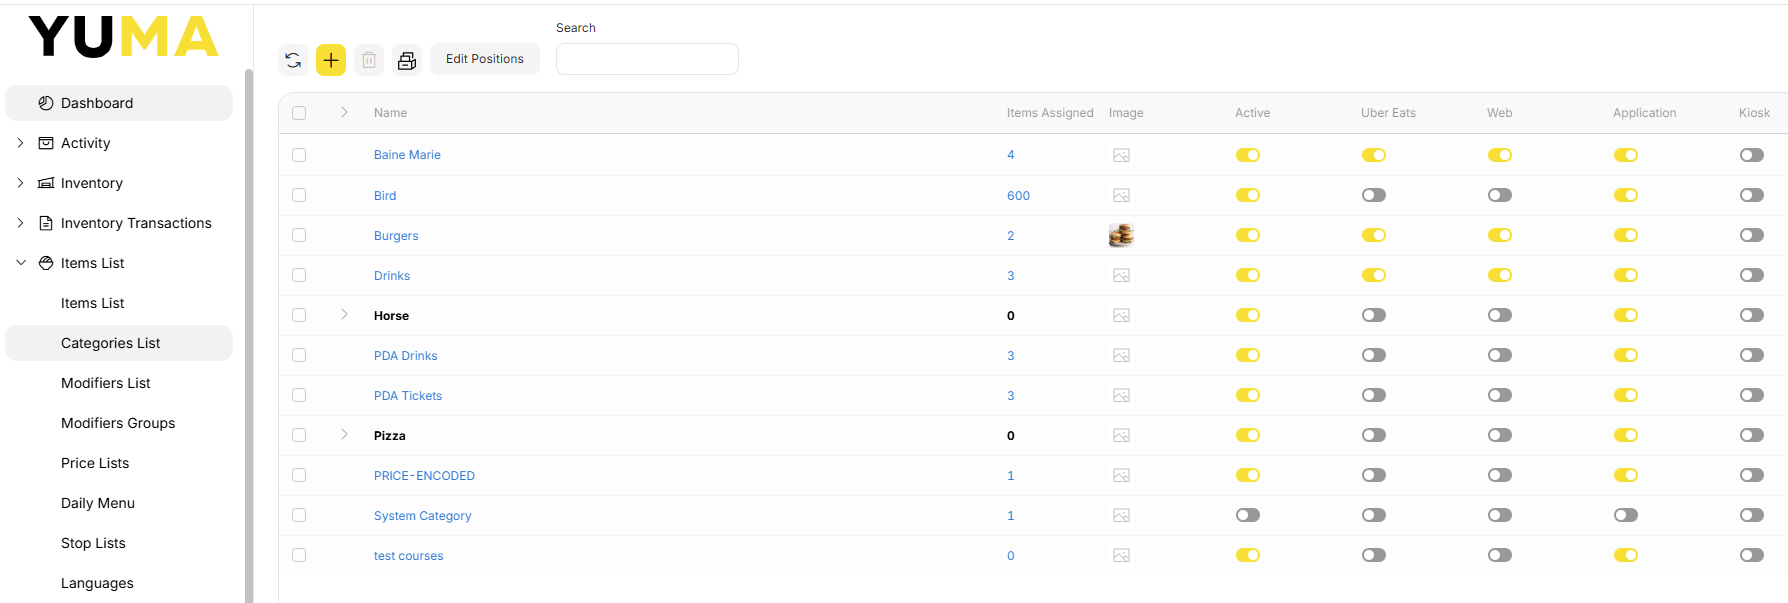
In the top bar we can see:
Refresh – to pull the latest list of MENU ATEGORIES without using your browsers cache
- Add – to open the new MENU CATEGORY dialogue
- Delete – to move the selected MENU CATEGORY to the Archive
- Archive – to view what has been deleted
- Edit Positions – to manually change the sort order displayed on your devices
- Search – to enter a string to find a MENU CATEGORY
Looking at each MENU CATEGORY as a line item, we can see:
- a check box that when selected will make available the delete icon
- an indicator to show that this is a PARENT with CHILDREN ( eg Horse ). You may expand individually or expand all by selecting the > in the grey bar.
- the name that has been given
- the number of MENU ITEMS that have been assigned to each MENU CATEGORY
- if an IMAGE has been added
- the <Active> toggle that will make the MENU CATEGORY available or not available
- the remaining <toggles> allow you to fine-tune where your MENU CATEGORIES will be available
- Uber Eats
- Web APP and eSHOP
- POS, Waiter & Driver APPs
- Self-Serve Kiosk
Add New Menu Category
Click on the <+> icon to open the dialogue
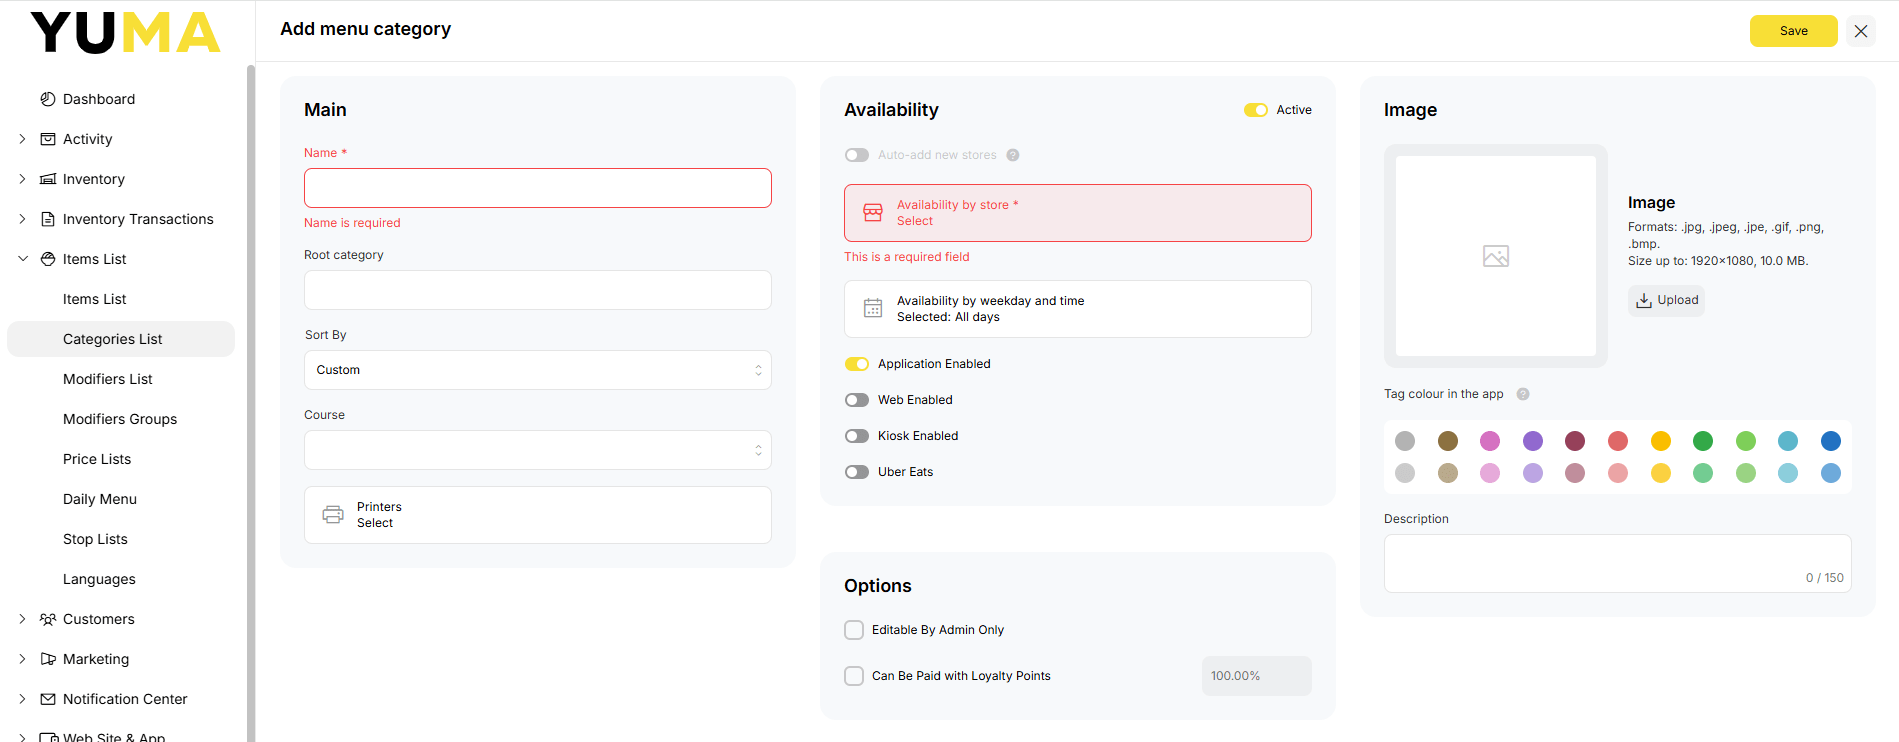
Main
Below is a brief description of each field. Note that some are compulsory and are marked with ‘*’. Please remember that these will be visible to end users, depending on your settings.
- Name* : Set a useful name to help identify the MENU ITEMS that will be contained inside this MENU CATEGORY.
- Root Category : If this is the CHILD of a PARENT, select the PARENT CATEGORY here.
- Only a CATEGORY with no MENU ITEMS in it can be PARENT.
- Sort by : Select your default SORT ORDER or the MENU ITEMS inside this CATEGORY.
- Custom where you will manually drag & drop them.
- Price Asc to list them from lowest to highest price.
- Price Desc to list them from highest to lowest price.
- Name Asc to sort alphabetically from A to Z.
- Name desc to sort alphabetically from Z to A.
- Course : will be the default to be used by restaurants or as a way to separate and group “like” goods and services on production printers.
- Printers : is where you select the default “logical” production printer to use.
Availability
- Active : turns the MENU CATEGORY on and off.
- Auto Add New Stores : when you add a new STORE, the MENU CATEGORY will be automatically added to that new STORE.
- Availability by Store* : Select which STORES will show this MENU CATEGORY on their screens.
- Availability by weekday and time : is used for time based menus. An example would be a Breakfast menu that is only available between 0700 and 1130.+
- The next four toggles are the same as on the LIST screen
- Application Enabled : POS, Waiter & Driver APPs
- Web Enabled : Uber Eats
- Kiosk Enabled : Self service kiosk
- Uber Eats : Will be available using the Uber AU Integration.
Options
- Editable by Admin only : the logged in user must be in the Admin ROLE.
- Can be Paid with Loyalty Points : leave disabled if you have no intention of using the LOYALTY system or if the MENU ITEMS inside this MENU CATEGORY are unable to be paid for using LOYALTY POINTS.
Image
- Image : If you are going to be selling online, you really do not want to leave this as an ugly grey box.
- You can select an image that will be shown instead. Please note the dimensions and file type & size.
- You can also select just a coloured block.
- You can use both !
- If you use both, the image will be used to show on WEB APP, eSHOP, MOB APP… On the POS APP you can override this so the POS only shows the colour block.
- Description : is used to provide the online buyer an idea of what your MENU CATEGORY contains.
Save
- Make sure you <save> your hard work.
Edit Menu Category
If you select an existing MENU CATEGORY, you my edit any of the above fields s well as gain access to a few more :
Label
- This is used to set the default action to be taken if you are going to be, for example, be printing PRODUCTION LABELS for these MENU ITEMS.
- An example might be a bubble tea printer or a pc build label where you require a separate sticker for each.
Tags
- Are a way to sign a “label” to the MENU CATEGORY that can then be used to create PROMOTIONS, gather statistical information, etc.
- Tags may be PUBLIC or HIDDEN and will be covered in depth under BOM / TOOLS / TAGS.
Update
- Click <update> to commit the changes or select <X> to cancel changes.
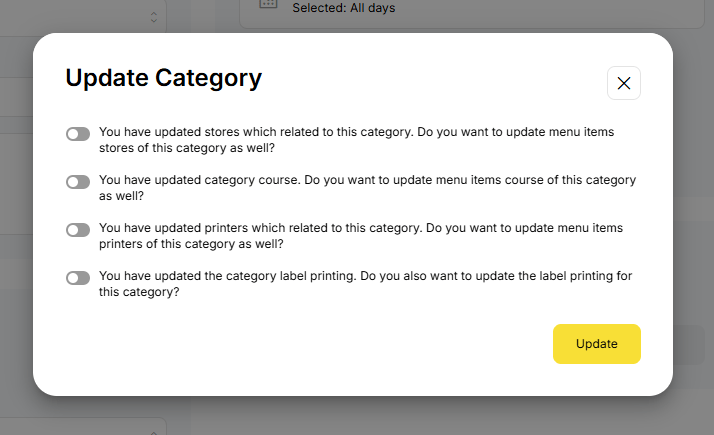
- A box, similar to the one shown above, will ask if you want to push the changes you have made to the MENU ITEMS contained in your edited MENU CATEGORY.
- You may fine tune what gets pushed using the <toggles>.
Delete Menu Category
- Using CATEGORIES LIST, you may select one or more followed by the <trashcan> to “delete” the MENU CATEGORY.
- Selections will be moved to the ARCHIVE provided :
- They contain no MENU ITEMS.
- Where a PARENT has CHILD CATEGORIES, the PARENT will be moved to the ARCHIVE and the CHILDREN will become top level
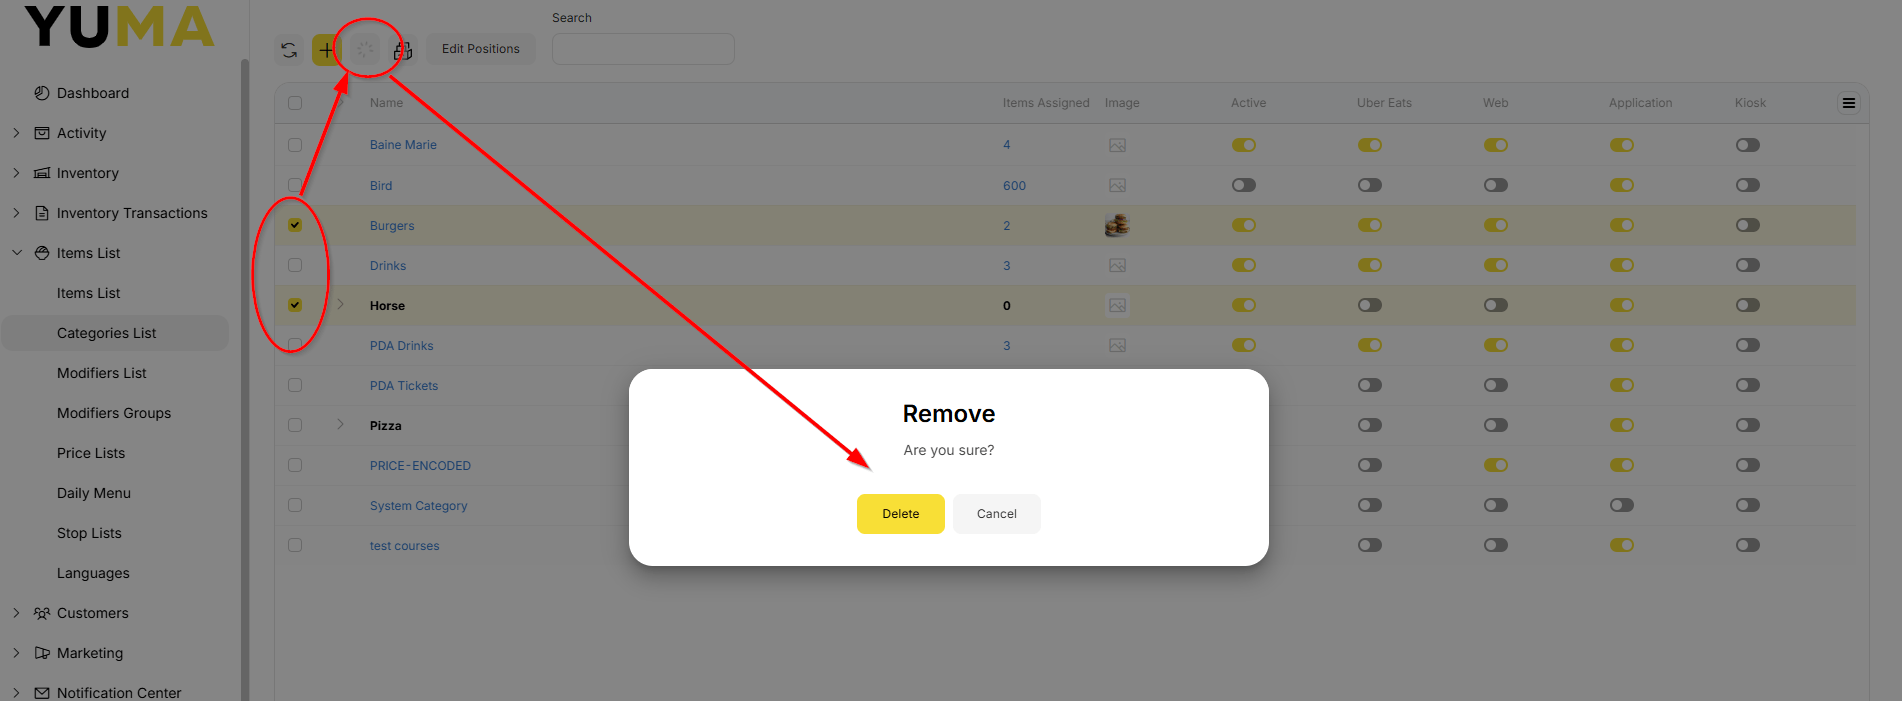
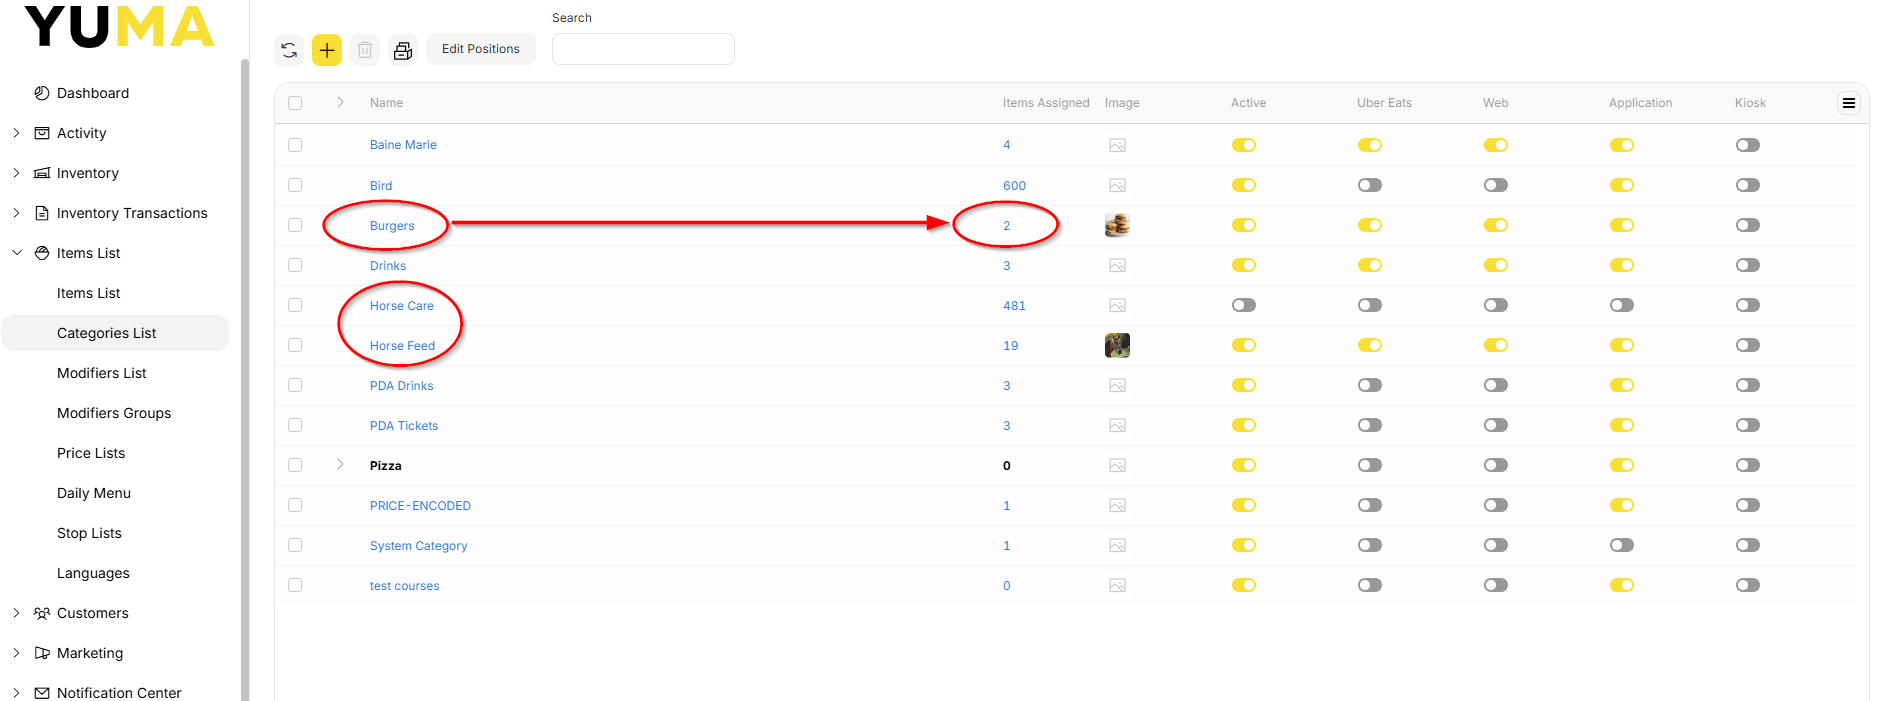
- In the above images, we tried to delete “Burgers” & “Horse”.
- Burgers was not deleted because it had MENU ITEMS
- Horse was a PARENT, so when deleted “Horse care” & “Horse Feed” became top level.
Edit Positions
Your BOM will always list your MENU CATEGORIES in alphabetical order.
You might want them to be listed differently on your POS and Apps.
You can drag & drop your MENU CATEGORIES into a weighted sort order.
Navigate to BOM /Items List / categories List and select <Edit Positions>.
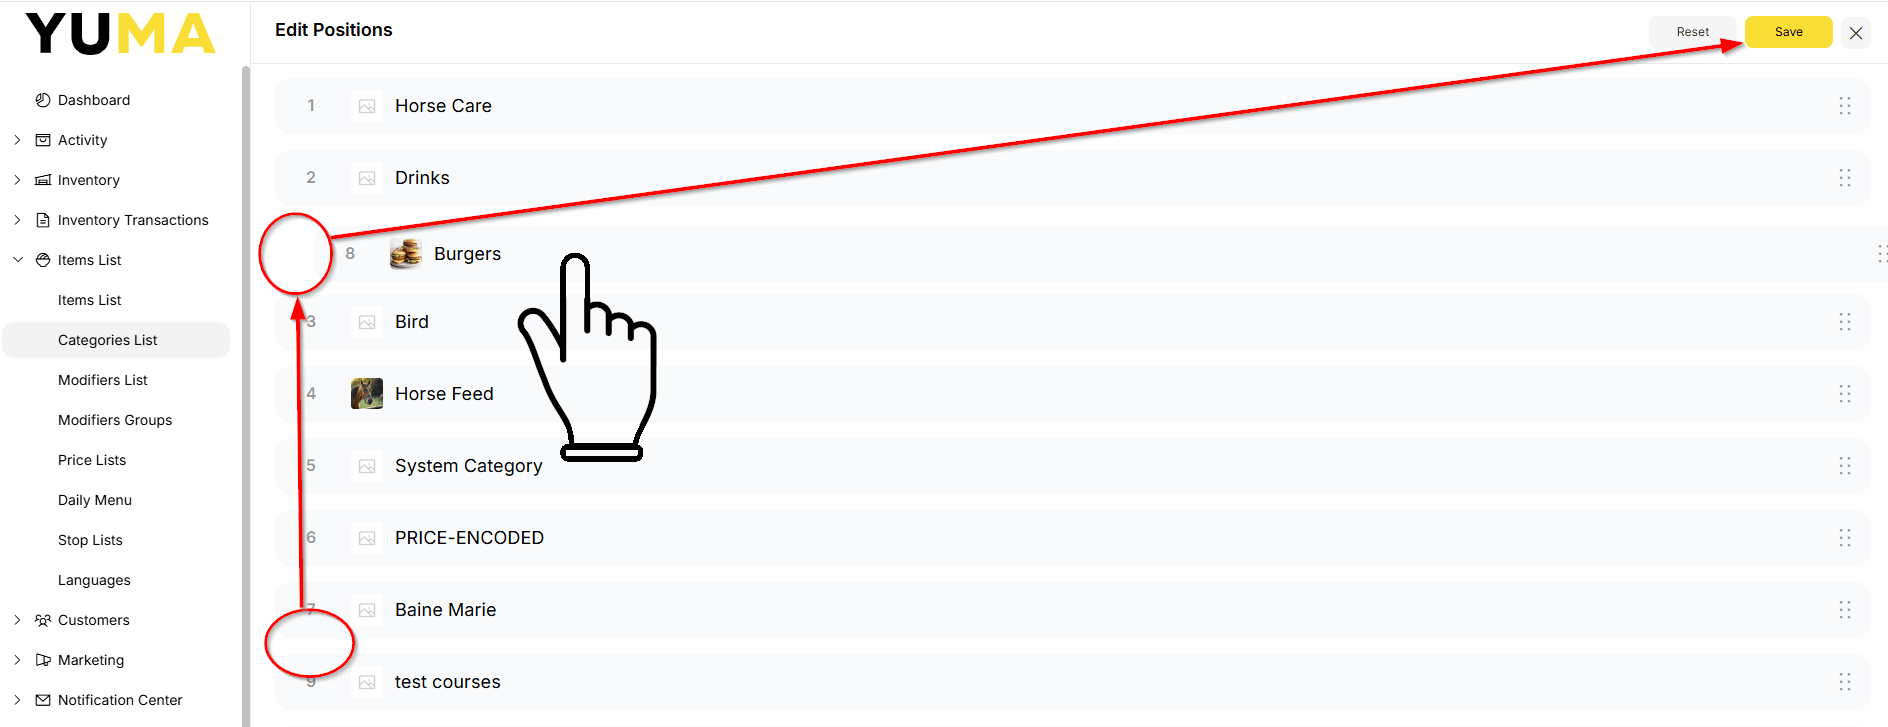
- Grab a CATEGORY with the left mouse button
- Drag it to where you want it to be
- Release left mouse button
- <Save> when you are done