-
YumaPOS
-
- The YumaPOS Ecosystem
- Plan Where You Want to be in 6 and 12 Months from Now
- Create Your YumaPOS TENANT
- Create STORES in your YumaPOS TENANT
- Make Life Easy : Preset Some Basic Settings
- Which is best for You? Manual Entry or Data Import?
- Great Structure Makes Selling Easier
- Positive Planning Prevents Poor Performance
- POS and ORDER Fundamentals
- Getting to Know Your New BOM
- Cheap Internet Can Cost Businesses Time, Money and Productivity
- Security : Do you Really Want Your Staff Doing That?
- Stock Control: What It Is and How to Know If It’s Right for Your Business
- Scale Your Business : YumaPOS for Single to Franchise Growth
- A Quick Guide to Where ITEM Cost Comes From
- Know Your Customers, Earn Their Loyalty, Grow Your Sales
- Yumapos Price Lists, Holiday Promotions & Surcharging - Made Easy
- Glossary of Terms
- Show Remaining Articles (3) Collapse Articles
-
-
- Quickly List Transactions Created by Your STORES and APPs
- Easily See Transactions by Staff Member
- It is Simple to Track Sales by Terminal
- Processing Order Tracking: How to Minimise Operational Loss
- Voided Orders Explained: Why You Need to Catch Them
- Action Logs: Why they are Important to Your Business
-
-
- Articles coming soon
-
- Articles coming soon
-
- Articles coming soon
-
- Articles coming soon
-
- Articles coming soon
-
- Articles coming soon
-
- Articles coming soon
-
- Articles coming soon
-
- Articles coming soon
-
- Articles coming soon
-
- Articles coming soon
-
- Articles coming soon
-
- Articles coming soon
-
-
- Inventory Items & Menu Items: Can You Tell the Difference ?
- Your Easy Guide to Menu Item Basics
- How to View and Manage the Menu Items List
- Create and Manage Menu Categories Easily
- Understanding Item Modifiers for Accurate Production and Lower Costs
- Complete Guide to Managing Item Modifiers in Your Business
- Point of Sale Price Lists Made Easy : A Complete Guide
- Daily Menu Configuration and How to Use Them
- How to Use Stop Lists to Prevent Overselling
- Changing Default Language for Production
-
-
- Articles coming soon
-
- Articles coming soon
-
- Articles coming soon
-
- Articles coming soon
-
- Articles coming soon
-
- Articles coming soon
-
-
-
- Articles coming soon
-
- Articles coming soon
-
- Articles coming soon
-
-
-
- Articles coming soon
-
- Articles coming soon
-
- Articles coming soon
-
- Articles coming soon
-
- Articles coming soon
-
-
-
- Articles coming soon
-
- Articles coming soon
-
- Articles coming soon
-
- Articles coming soon
-
-
-
- Articles coming soon
-
- Articles coming soon
-
- Articles coming soon
-
- Articles coming soon
-
-
-
- Articles coming soon
-
- Articles coming soon
-
- Articles coming soon
-
- Articles coming soon
-
- Articles coming soon
-
- Articles coming soon
-
- Articles coming soon
-
- Articles coming soon
-
- Articles coming soon
-
- Articles coming soon
-
- Articles coming soon
-
-
-
- Articles coming soon
-
- Articles coming soon
-
- Articles coming soon
-
- Articles coming soon
-
- Articles coming soon
-
- Articles coming soon
-
- Articles coming soon
-
- Articles coming soon
-
- Articles coming soon
-
- Articles coming soon
-
- Articles coming soon
-
-
-
- Articles coming soon
-
- Articles coming soon
-
- Articles coming soon
-
- Articles coming soon
-
- Articles coming soon
-
- Articles coming soon
-
-
- Articles coming soon
-
- Articles coming soon
-
- Articles coming soon
-
- Articles coming soon
-
- Articles coming soon
-
- Articles coming soon
-
- Articles coming soon
-
-
- Articles coming soon
-
- Articles coming soon
-
- Articles coming soon
-
- Articles coming soon
-
- Articles coming soon
-
- Articles coming soon
-
- Articles coming soon
-
-
- Articles coming soon
-
-
-
YumaPAY
Preface
For this article, we assume you are conversant with Understanding Item Modifiers for Accurate Production and Lower Costs.
Please ask your Support Team for clarifications as needed. They are more than happy to discuss your case model and work through it with you.
Related Modifiers
If you set ITEM TYPE as MENU ITEM, you will be given more control over your goods & services.
In your BOM, navigate to Items List / Items List and select one of your MENU ITEMS.
Select the RELATED MODIFIERS tab.

Add Related Modifier
Select <Create> to open the Create Modifier dialogue.
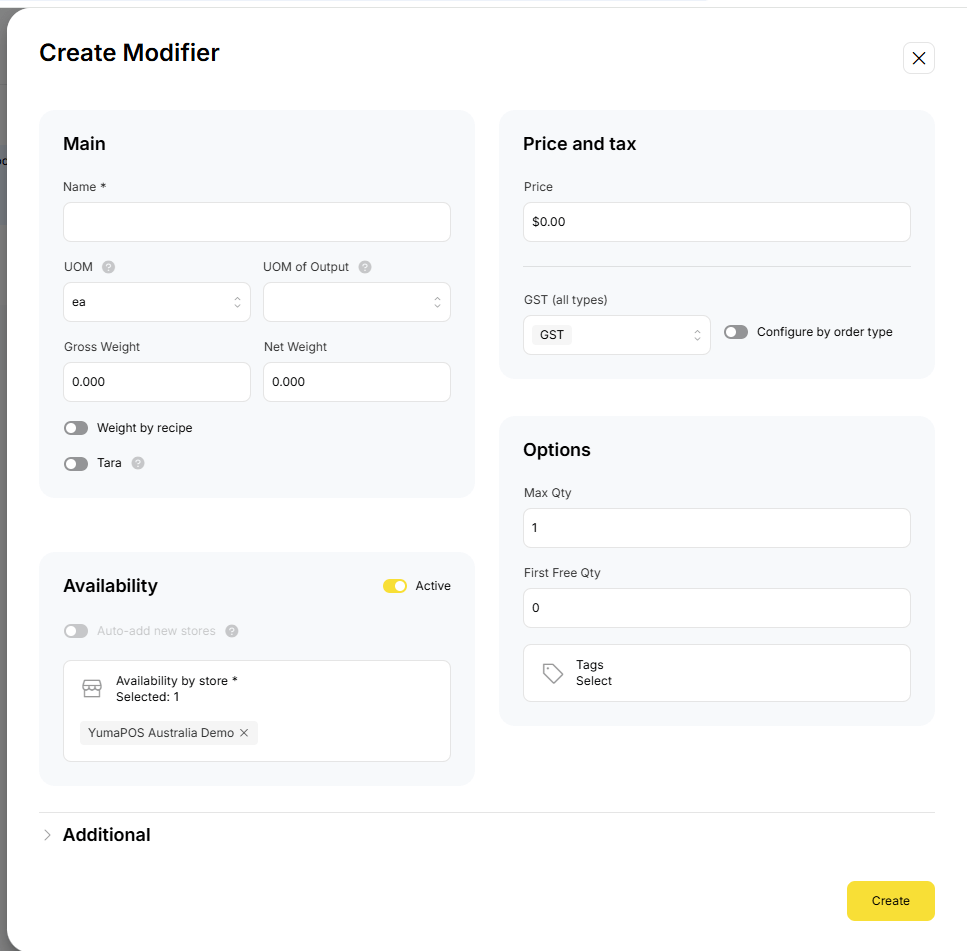
Main
- Name : is compulsory.
- UOM : should be predifined.
- UOM of Output : is what is shown on customer facing web app, mobile app or delivery integrations against the Net Weight field.
- Gross weight : is the packaged weight.
- Net Weight : is the tared weight.
- Weight by Recipe : is used to calculate a complex weight using RECIPES.
- Tare : is an automatic weight to be taken off.
Price & Tax
- Price : Specify the price to be charged to the CUSTOMER.
- Tax : Select the correct tax to be included in the above Price.
- Configure by Order Type : Not used in Au.
Availability
- Active : You may toggle this on or off to suit
- Auto Add New Stores : If you are using multi-store and will be adding more STORES, you may want to enable this.
- Availability by Store : You can fine tune which STORES this RELATED MODIFIER will be available at. ( I prefer to do this using the PRICE LIST ).
Options
- Max Qty : Selecting “1” will give you a check box. More will give you a + / – scroller.
- First Free Qty : if greater than “0” the price will not be applied until this amount has been selected.
- Tags : are a way to sign a “label” to the MENU ITEM
- Can then be used to create PROMOTIONS, gather statistical information, etc.
- Tags may be PUBLIC or HIDDEN and will be covered in depth under BOM / TOOLS / TAGS.
Works Burger Example
Again, we will use food as an example, but it could just as easily be a pool chemical that the user needs to select a container size against or a labour hire that needs a time frame chosen.
Our Works Burger has a choice of 3 bun types, 4 sauces ( 2 are free, more are $0.50 extra ) and we can remove any of the fillings.
Separate Groups
If we <Create> our RELATED MODIFIERS, they are initially placed into separate RELATED MODIFIER GROUPS.
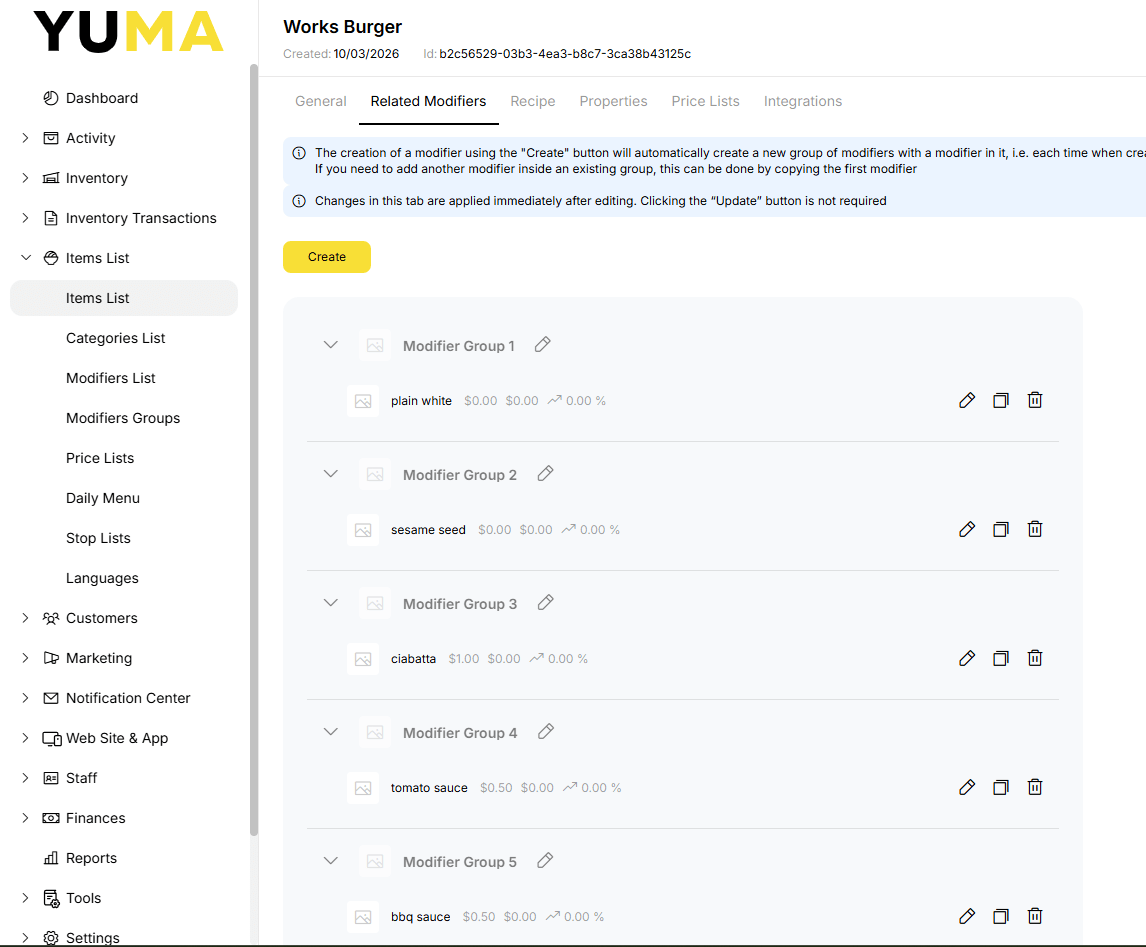
We want to put our buns into one RELATED MODIFIER GROUPS and our sauces into another.
Moving Into “Like” Groups
We do this using drag-n-drop.
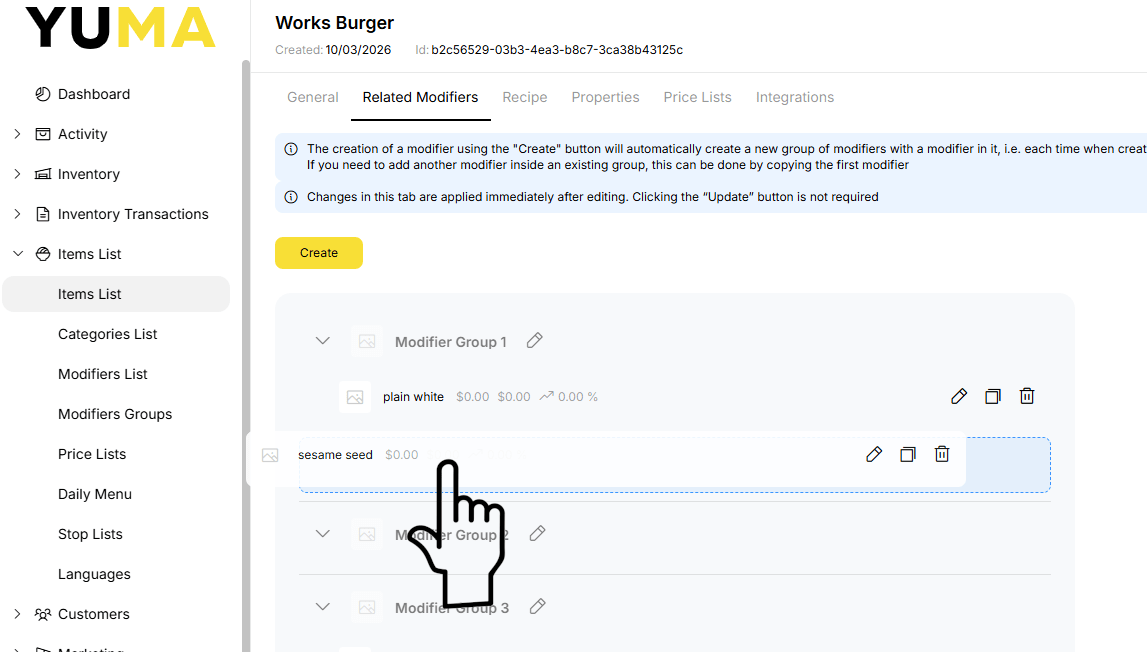
Note : if you drop it a bit to the right, you will create a new branch. This allows you to do things like “if this is chosen, offer up these options, but if this one is chosen do something different”.
Here is the result for our Works Burger …
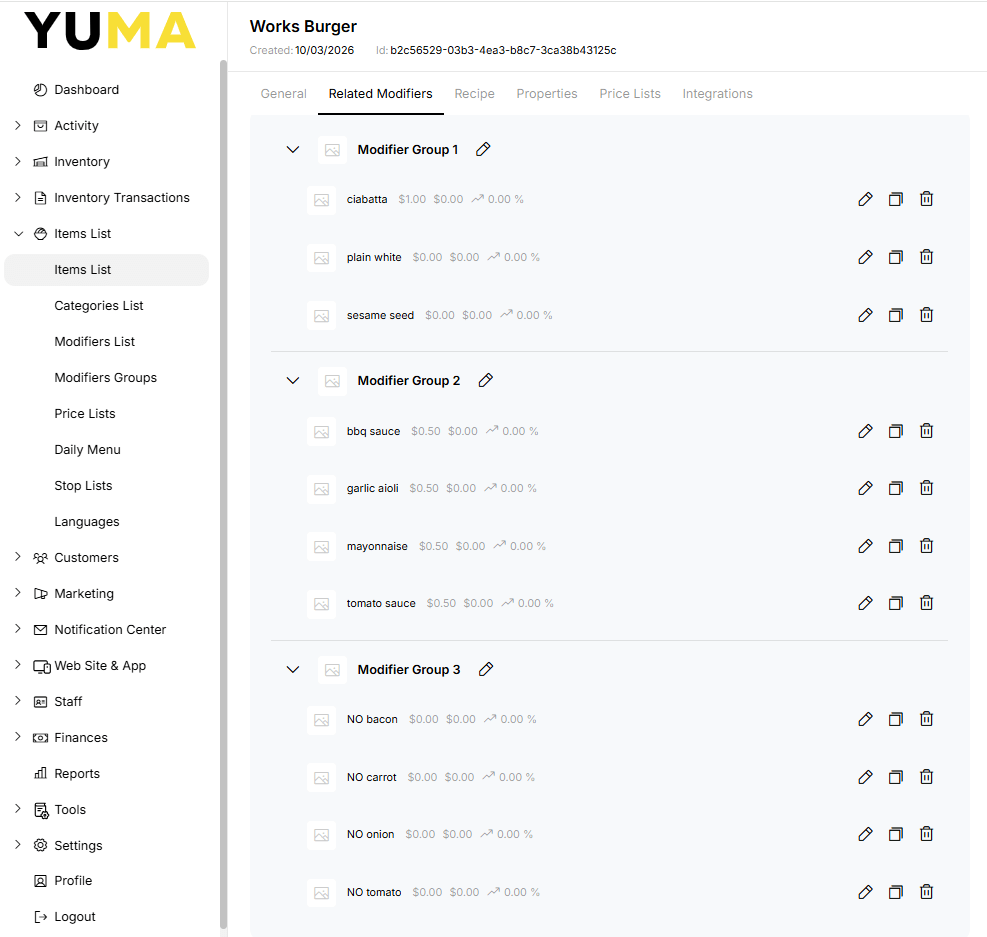
Now that we have a decent structure, we can play with the settings for each of these GROUPS.
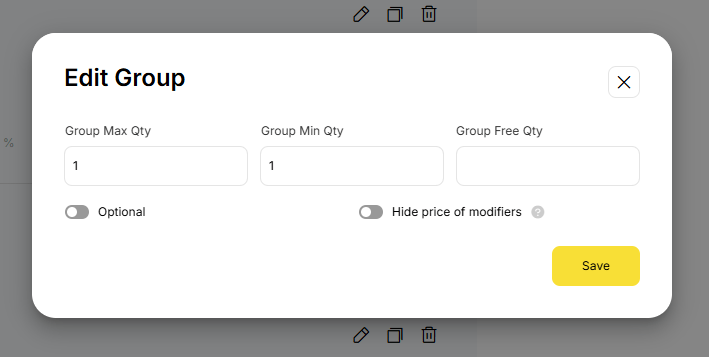
Our Bun Type ( Modifier Group 1 ), must be chosen and only one can be chosen.
Set Group Options
Select the <edit pen> icon and set them as below …
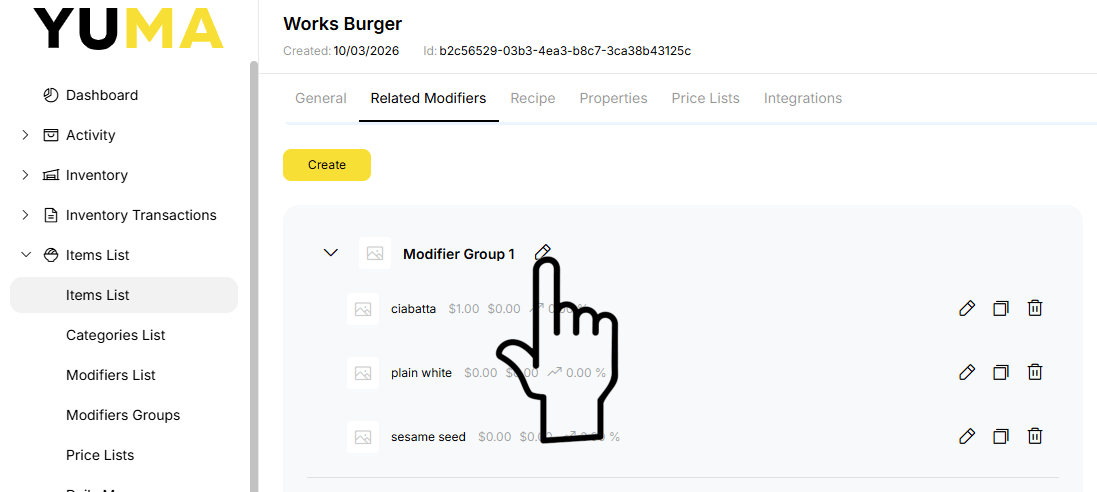
Our sauces will be slightly different.
…4 sauces ( 2 are free, more are $0.50 extra )…
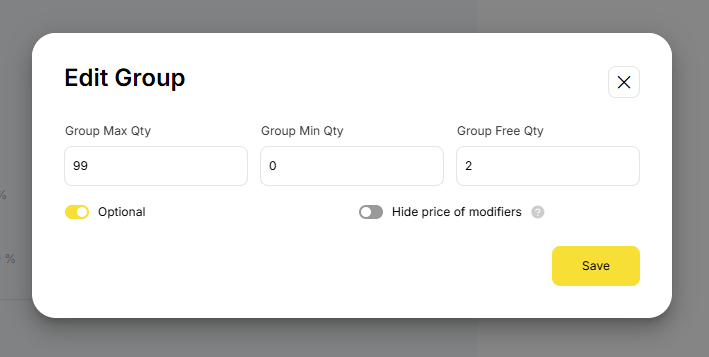
Our “No …” group is set as optional …
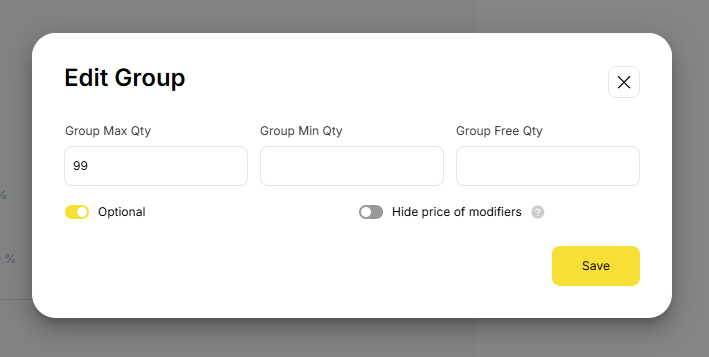
I have added no “Extras…” as RELATED MODIFIERS because I am smart and know that the same extras may apply to multiple burgers. So I will create them as a COMMON MODIFIER GROUP.
Common Modifiers
“If a MODIFIER GROUP can be applied to multiple MENU ITEMS, it is easier to add a new MODIFIER or change the price, once. In this way, a single change is applied across all affected MENU ITEMS.”
View Common Modifier Groups
Sign into your BOM and navigate to Items List / Modifier Groups.
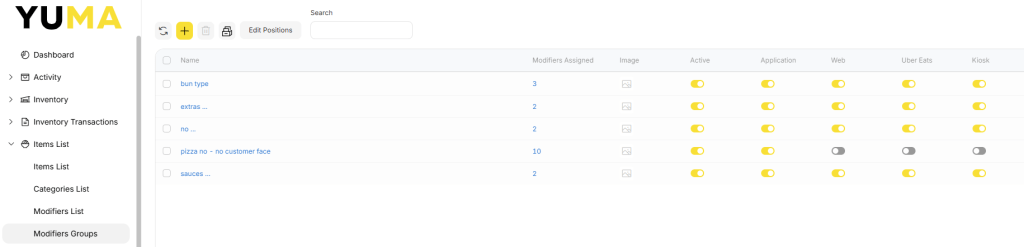
In the top bar we have :
- Refresh
- Add
- Delete
- Archive
- Edit Positions
- Search
In the list we have :
- Check box to select one or more
- Name that has been given
- How many COMMON MODIFIERS are in that GROUP
- The image that has been used
- A toggle to make the GROUP Active / Inactive
- Toggles to determine where to show the GROUP
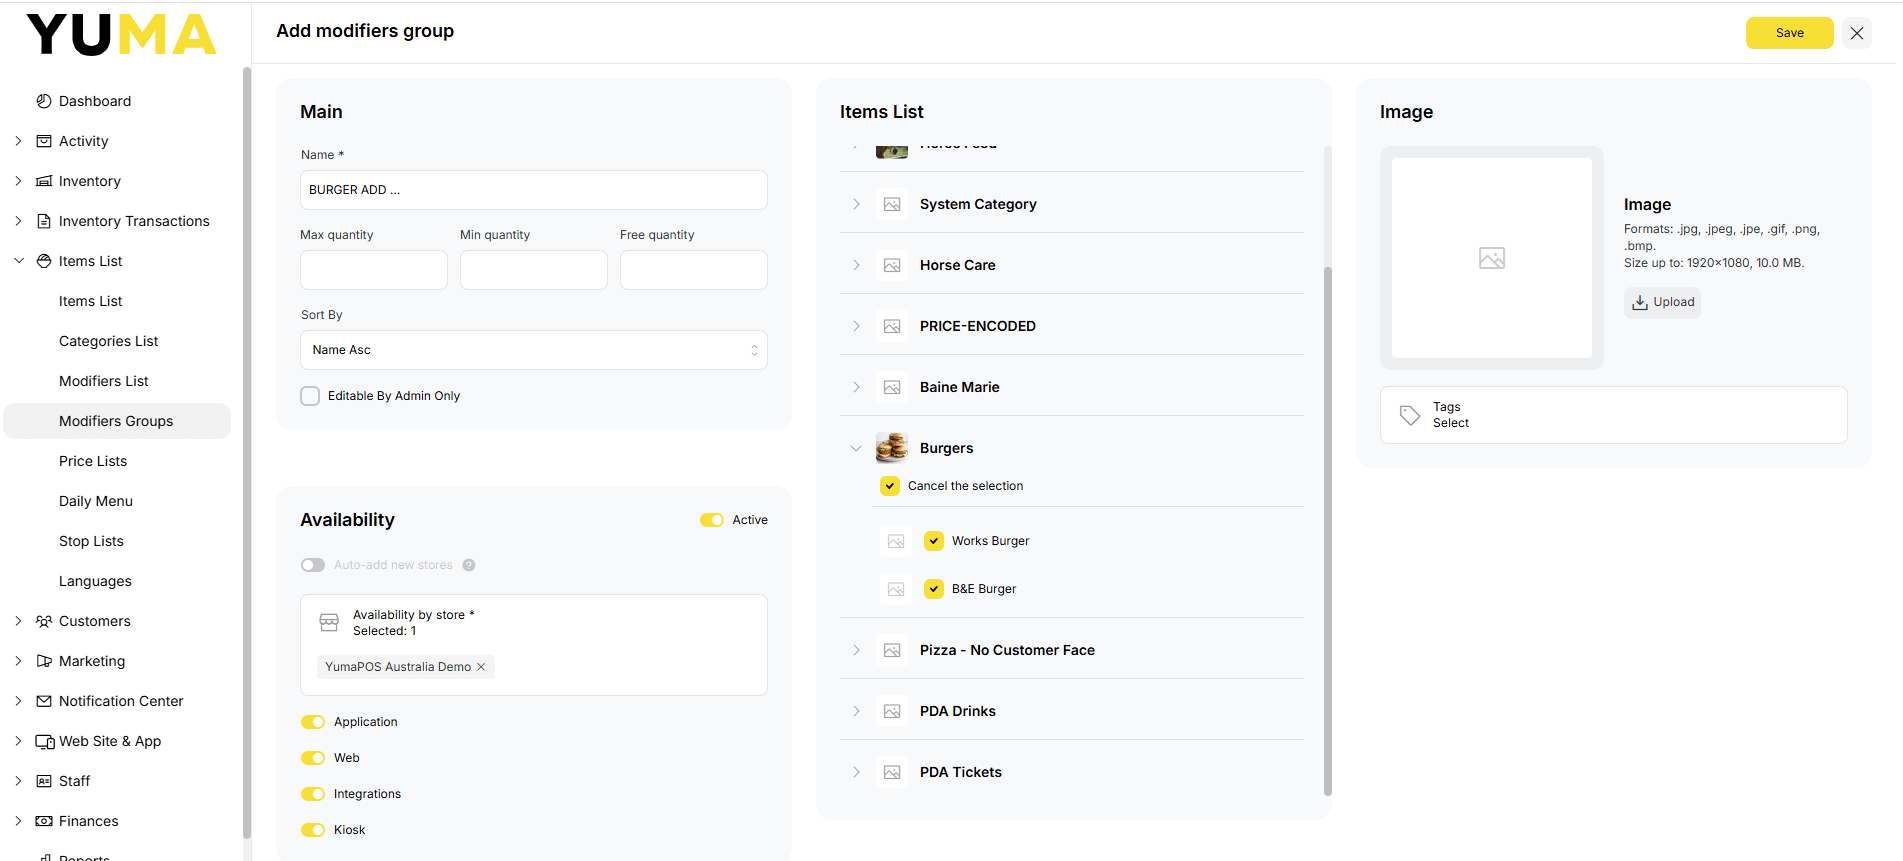
Add Common Modifier Group
Click on the <+> icon to open the dialogue.
Note : A GROUP must exist before you can create a COMMON MODIFIER.
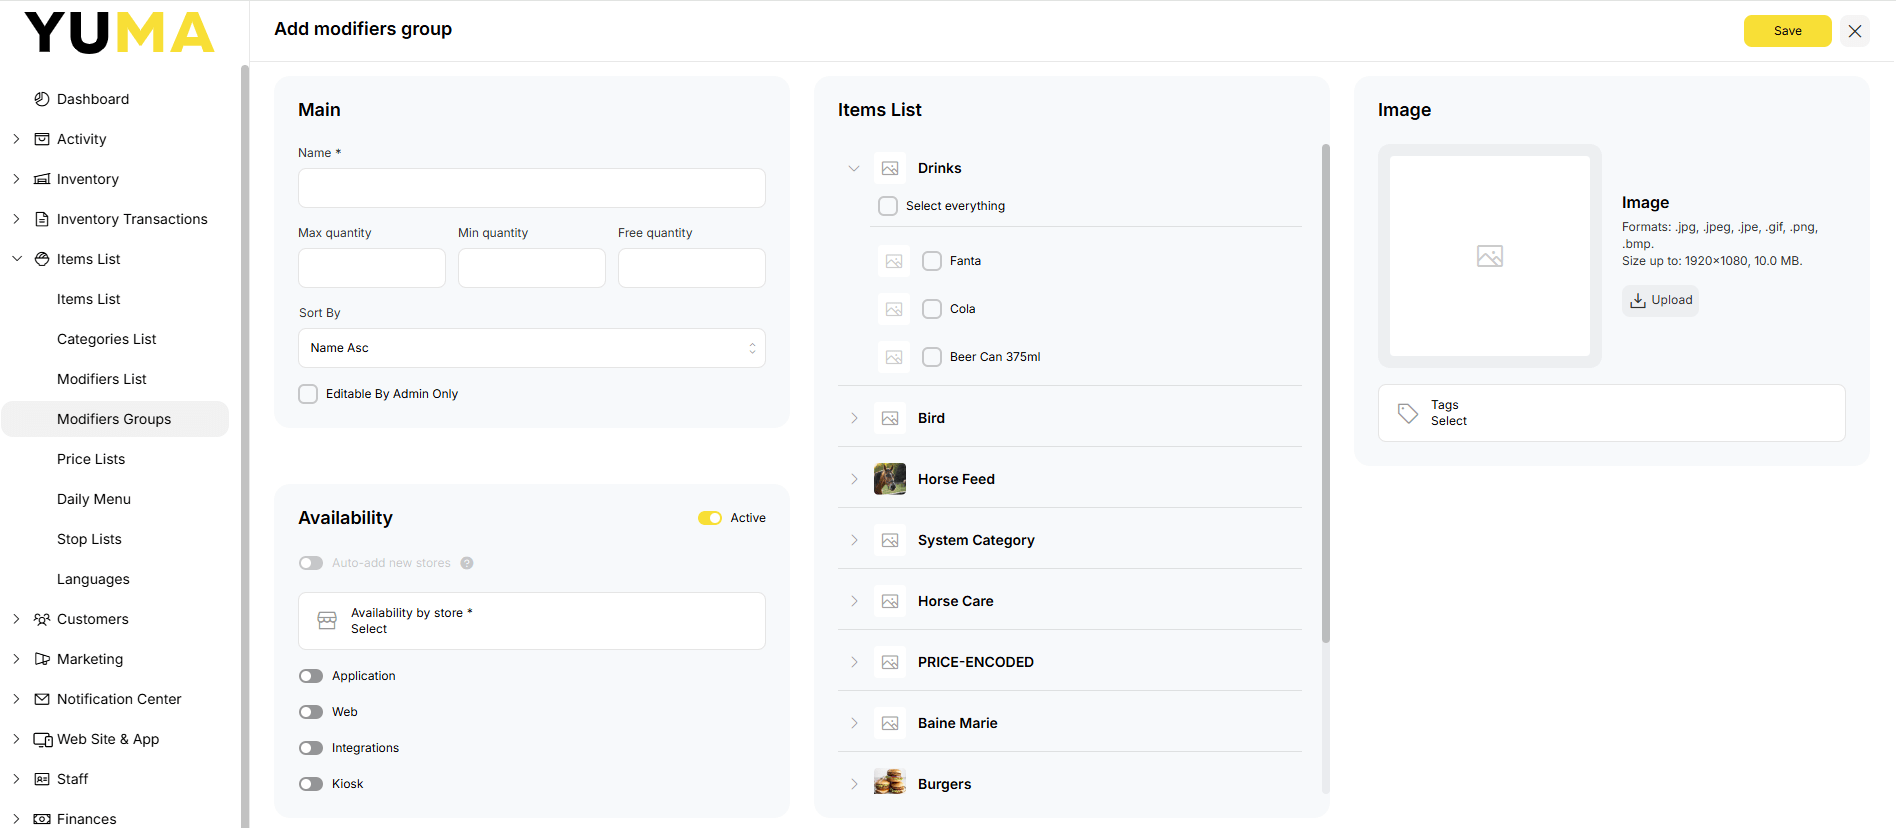
Main
- Name : of that is shown & printed
- Max Quantity : The most number of COMON MODIFIERS that may be selected
- Min Quantity : The least number of COMMON MODIFIERS that may be selected
- Free Quantity : How many can be chosen before the ORDER value is increased
- Sort By : the default sort order to be used by this group
- Editable by Admin Only : the logged in user must be in the Admin ROLE to be able to alter this GROUP
Availability
- Active : turns the COMON MODIFIER GROUP on and off.
- Auto Add New Stores : when you add a new STORE, the COMMON MODIFIER GROUP will be automatically added to that new STORE.
- Availability by Store* : Select which STORES will show this COMMON MODIFIER GROUP on their screens.
- The next four toggles are the same as on the LIST screen
- Application Enabled : POS, Waiter & Driver APPs
- Web Enabled : Uber Eats
- Integrations : Online ordering platforms such as Uber Eats
- Kiosk Enabled : Self service kiosk
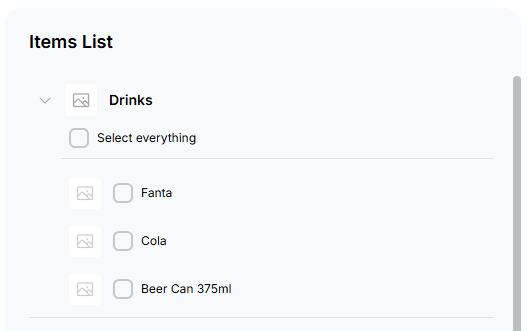
Items List
- Use the “>” to expand the MENU CATEGORY
- “Select Everything” or individual MENU ITEMS
- The user will be shown this COMMON MODIFIER GROUP if enabled in Availability
Image
- Will be used as a place holder
- Formats: .jpg, .jpeg, .jpe, .gif, .png, .bmp
- Size up to: 1920×1080, 10.0 MB.
- Number of files up to: 1
Tags
- Are a way to sign a “label” to the COMMON MODIFIR GROUP that can then be used to create PROMOTIONS, gather statistical information, etc.
- Tags may be PUBLIC or HIDDEN and will be covered in depth under BOM / TOOLS / TAGS.
Edit Positions of Common Modifier Group
- Show the list of groups
- Select <Edit Positions>
- Use drag & drop
- Select <Reset> or <Save>
This changes the order that they are shown to the user making the ORDER.
This will also be how they are shown on PRODUCTION SLIPS & TAX INVOICES.
It does not change the sort order shown in your BOM.
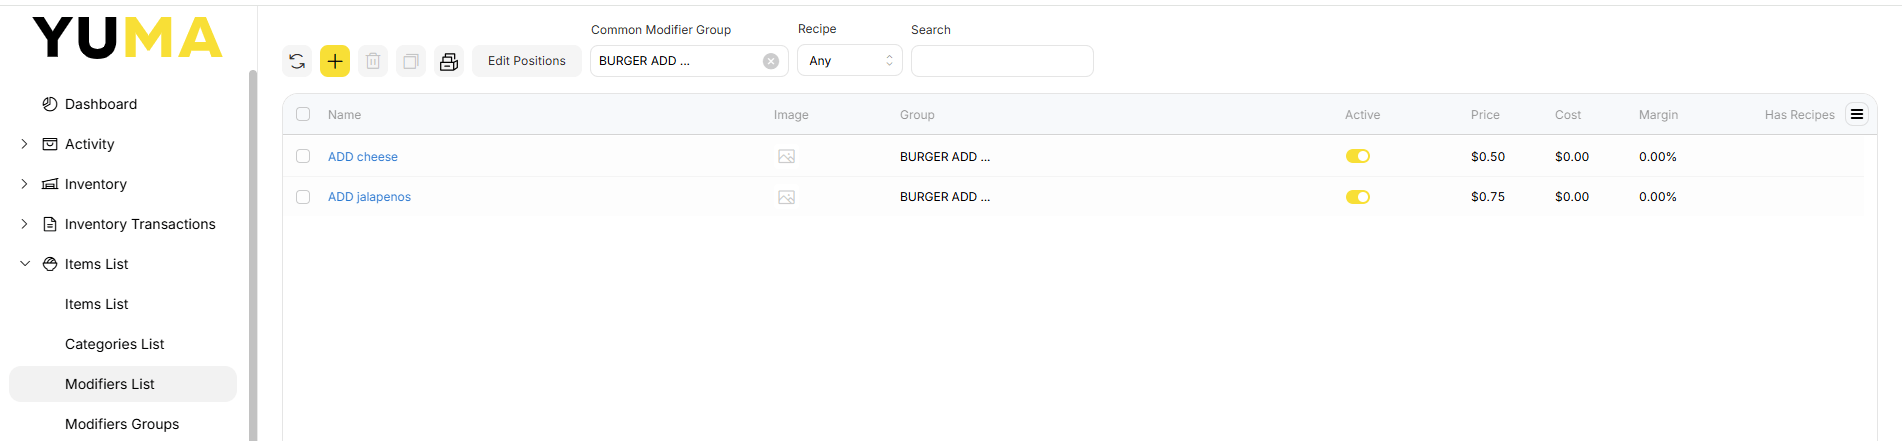
View Common Modifier List
Navigate to Items List / Modifiers List
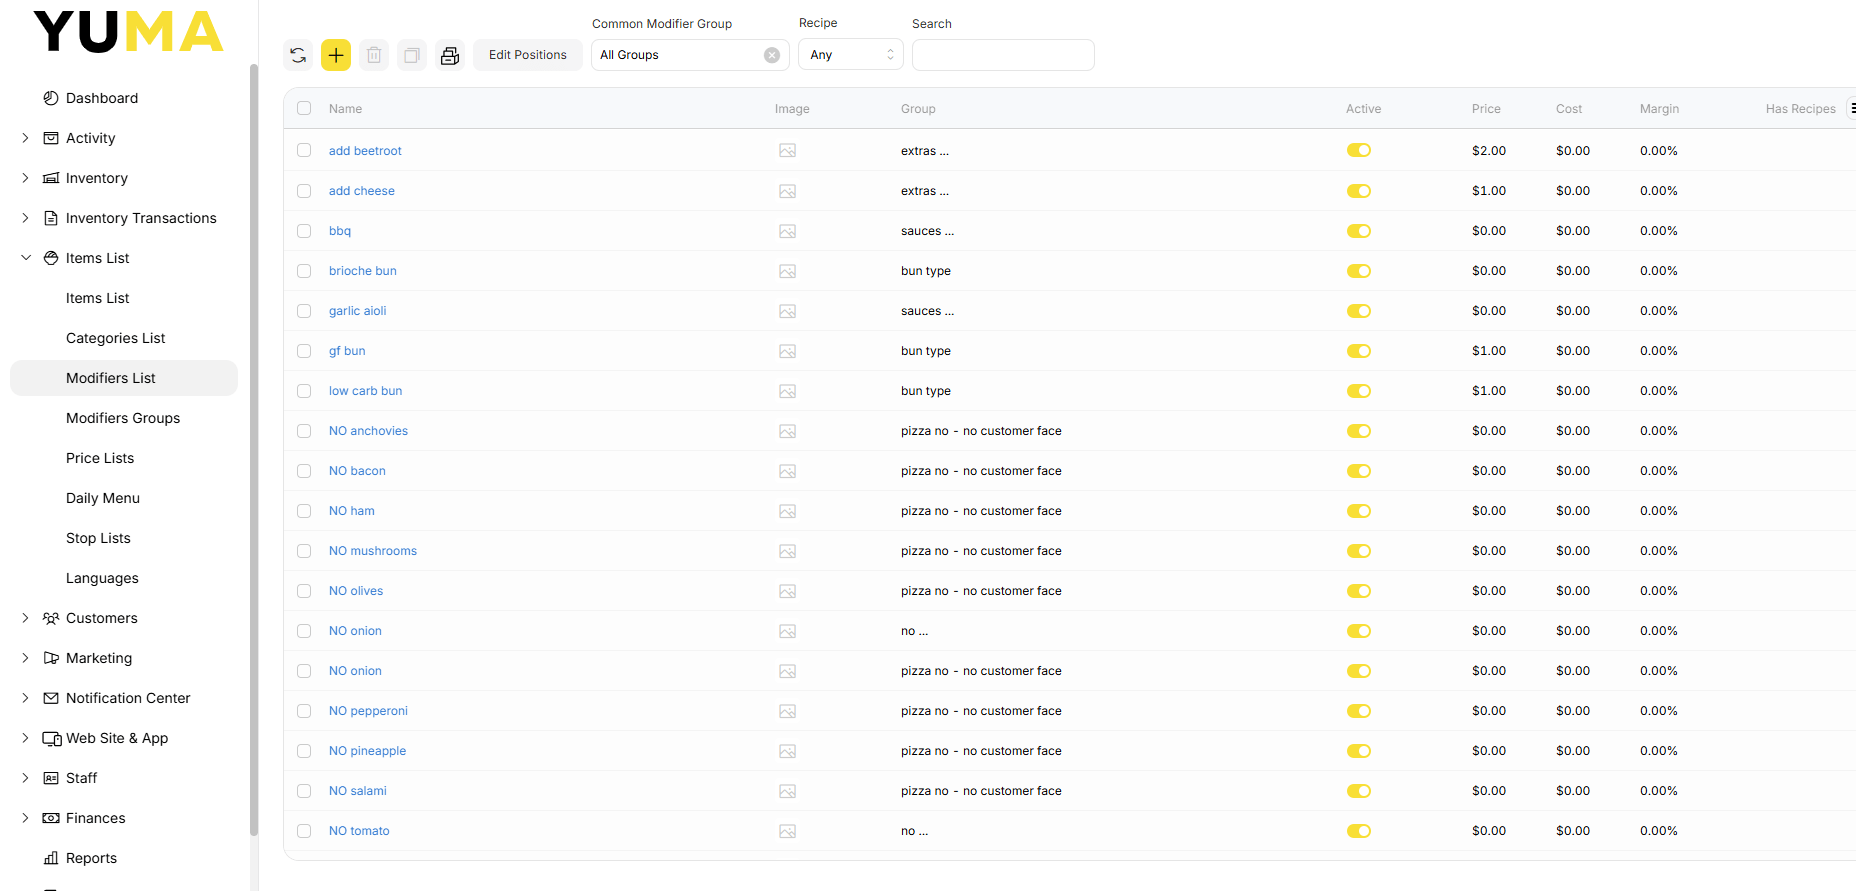
We have our functions and filters in the top bar.
The list shows available COMMON MODIFIERS, sorted alphabetically, with some key information.
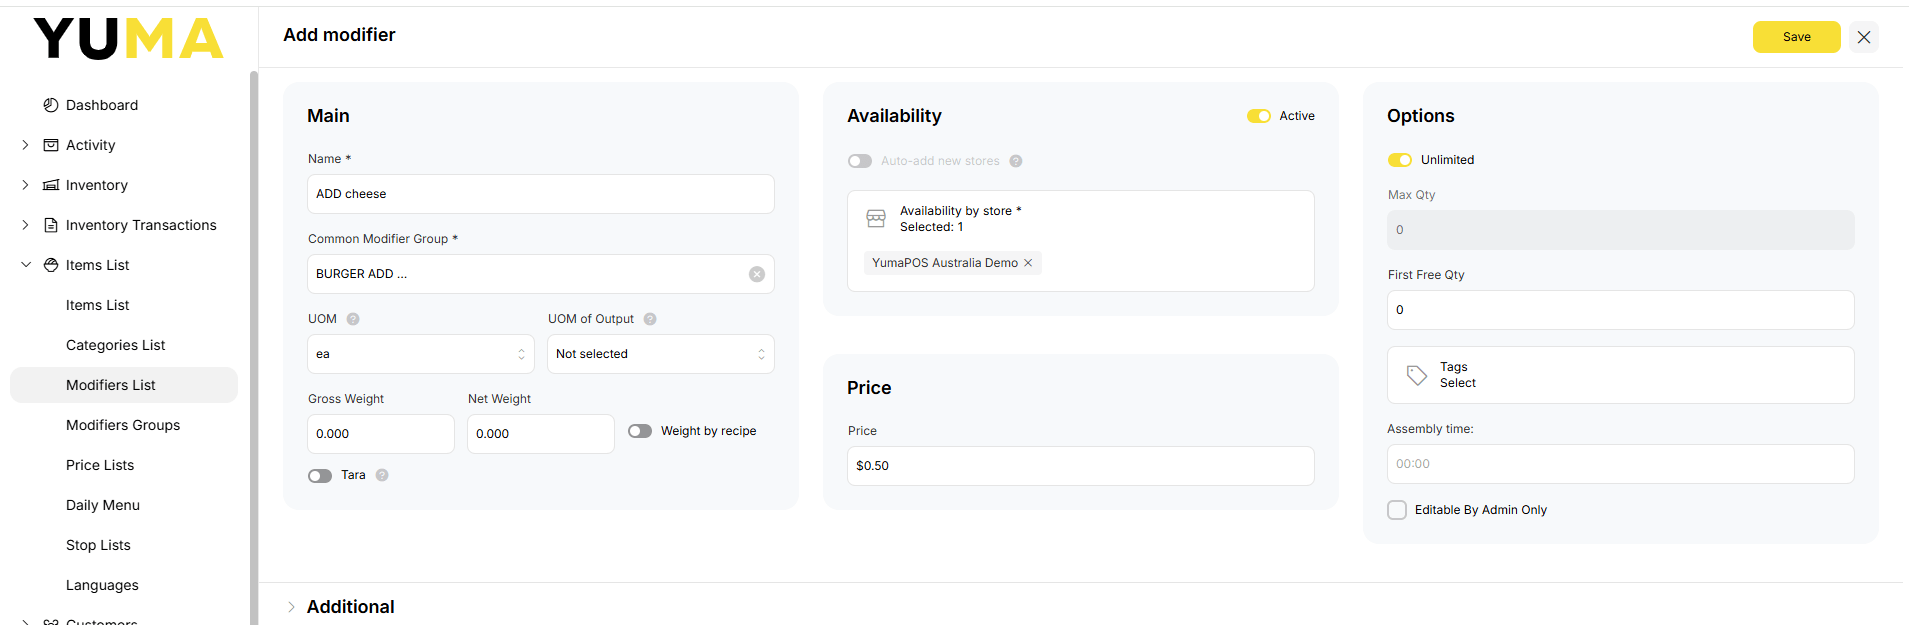
Add Common Modifier
Select the <+> symbol to open the dialogue.
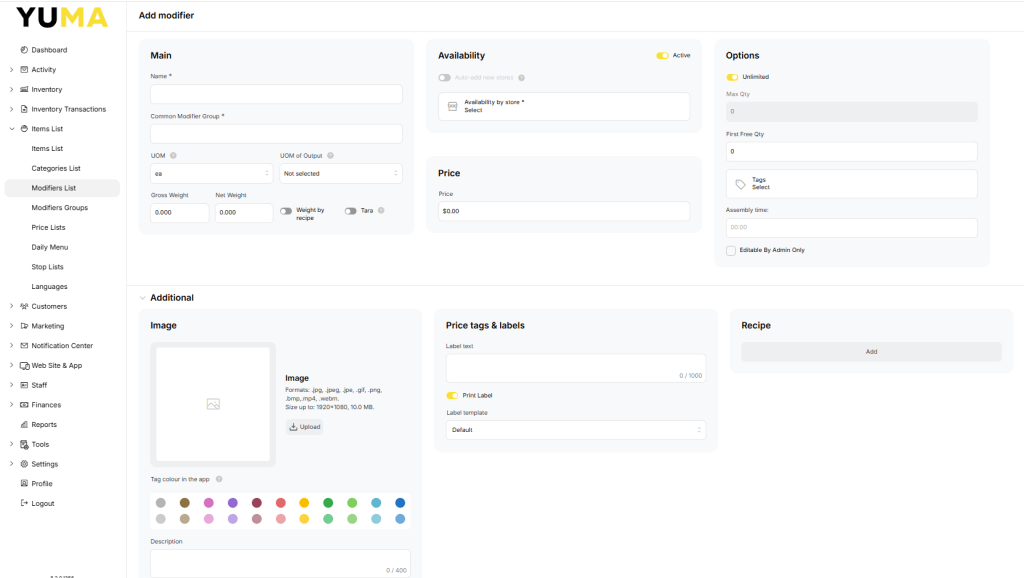
Main
- Name : Something that is meaningful to the user and production staff
- Common Modifier Group : Select which one this will appear in as an option
- UOM : should be predifined.
- UOM of Output : is what is shown on customer facing web app, mobile app or delivery integrations against the Net Weight field.
- Gross Weight : is the packaged weight.
- Net Weight : is the tared weight.
- Weight by Recipe : is used to calculate a complex weight using RECIPES.
- Tare : is an automatic weight to be taken off.
Availability
- Active : You may toggle this on or off to suit
- Auto Add New Stores : If you are using multi-store and will be adding more STORES, you may want to enable this.
- Availability by Store : You can fine tune which STORES this RELATED MODIFIER will be available at. ( This best is done using the PRICE LIST for Multi-STORE ).
Options
- Unlimited : User may select as many as they want. Turn off to limit how many may be selected.
- Max Qty : Selecting “1” will give you a check box. More will give you a + / – scroller.
- First Free Qty : if greater than “0” the price will not be applied until this amount has been selected.
- Tags : are a way to sign a “label” to the COMMON MODIFIER
- Can then be used to create PROMOTIONS, gather statistical information, etc.
- Tags may be PUBLIC or HIDDEN and will be covered in depth under BOM / TOOLS / TAGS.
- Assembly Time : Will be covered in Settings / Time Slots
- Editable by Admin Only : The logged in user must belong the to Admin ROLE to be able to alter these settings.
Image
- Formats: .jpg, .jpeg, .jpe, .gif, .png, .bmp
- Size up to: 1920×1080, 10.0 MB.
- Number of files up to: 1
- Image : If you are going to be selling online, you really do not want to leave this as an ugly grey box.
- You can select a beautiful image that does your COMON MODIFIER proud. Please note the dimensions and file type & size.
- Tag Colour in the App
- You can also select just a coloured block.
- You can use both !
- If you use both, the image will be used to show on WEB APP, eSHOP, MOB APP… On the POS APP you can override this so the POS only shows the colour block.
- Description : is used to provide the online buyer a description about how they can change the ITEM that entices them to buy.
Price Tags & Labels
Recipe
- This is your link to INVENTORY ITEMS.
- It is the link between what you BUY & SELL.
- Recipes may be simple 1:1 affairs or may be complex involving many calculations.
Edit Positions of Common Modifiers
- Navigate to Items List / Modifiers List and select <Edit Positions>
- Select the COMON MODIFIER GROUP you want to work with
- Use drag & drop to set the sort order
- <Reset> or <Save>
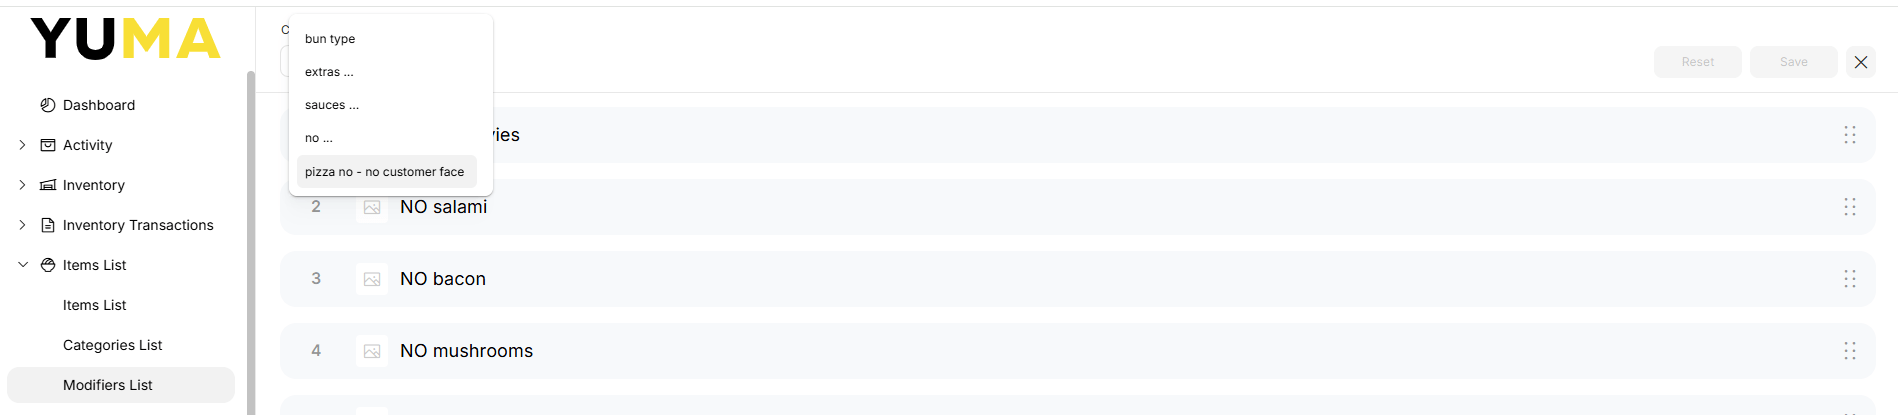
Works Burger Example
Earlier in this Article, we created our “No …” as RELATED MODIFIERS.
If we can re-use MODIFIERS across multiple MENU ITEMS, without changing the CUSTOMER UX ( user experience ) by offering to do something that doesn’t apply to that MENU ITEM, we could have used a COMMON MODIFIER GROUP containing every possible no – whether it applies to that MENU ITEM or not.
This of course would not look right for anything customer facing ( web. kiosk, etc )
I could also have created “NO works burger …” as a COMMON MODIFIER GROUP and attached it to the “Works Burger” MENU ITEM. Provided it didn’t mess up the MODIFIER PRECEDENCE. This would look good as customer facing.
How about “ADD …” so I can pimp my works burger with more cheese and lots of jalapenos ?
One option is to :
- Create an Optional, Unlimited Quantity RELATED MODIFIER GROUP called “ADD …”
- Create an Unlimited Quantity RELATED MODIFER called “ADD cheese” for $0.50
- Create an Unlimited Quantity RELATED MODIFER called “ADD jalapenos” for $0.50
- Add the other 20+ things that could be added
- Drag and drop them all into the RELATED MODIFIER GROUP called “ADD …”
- Then <Save>
- Repeat all of the above on all of my 15 available burgers
- Create an Optional, Unlimited Quantity COMMON MODIFIER GROUP called ” BURGER ADD …” and click <Select everything> in the “Burgers” MENU ITEM
- Create an Unlimited Quantity COMMON MODIFER called “ADD cheese” for $0.50 in “BURGER ADD …”
- Create an Unlimited Quantity COMMON MODIFER called “ADD jalapenos” for $0.50 in “BURGER ADD …”
- Add the other 20+ things that could be added
- Then <Save>
Same result as before … but in only 20 steps.
Oh ! The price of jalapenos has gone up – so I need to change them to $0.75 …. in 1 place !
Now do you see why Positive Planning Prevents Poor Performance ?